One of the most rewarding things is to share with others the works you have done.
Pages
▼
Wednesday, January 29, 2014
Another birthday card
Want a fast and simple card well this is it. Jennifer McGuire is the inspiration from a bonus on the Online Card class "Stenciled". My take on the card was to distress the stencil using Broken China and Peeled paint. The stencil is from Hero Arts "Lg Lotus" which was put at an angle. The sentiment was stamped using the distressed image as a guide using Hero Arts "Enjoy Today". The stamped image was put on the card stock and trimmed, then edged with scraps and mounted on the card base. Quick and simple. Hope you enjoy.
Monday, January 27, 2014
Splatters
This card was created using inspiration from the day two of the Online Card Class "Stenciled". The sentiment was embossed in white and distress inks were used along with the Tim Holtz "Splatters" stencil to make the base of this card. Distress Ink colors used were Wild Honey, Festive Berries and Squeezed Lemonade. The sentiment is "Find Joy" from Hero Arts. Hope you enjoy.
Sunday, January 26, 2014
Texture and Dimension with Pastes-Stenciled
Day 3 of the Online Card Class: Stenciled uses texture and dimension to complete a card. I do not have a tweed stencil so again using the Silhouette a stencil was created. This card is a top fold and is 3.5 by 5 finished size. The top layer is 3.4 by 4.75 and has been popped up. Picked Raspberry distress ink was used in the lower left corner of the card and on the butterfly that was cut with a Spellbinder die. The butterfly was inked with the distress ink and then dry embossed. Molding paste was used to with the tweed stencil to create the background. Other supplies used included a leaf die from Memory Box, gems from Bo Bunny and a sentiment stamp from Impression Obsession. Hope you enjoy
Stencils and Masking
Day One of the Online Card Class: Stenciled using the technique of masking. This is my take on one of the cards.
I do not have a sun ray so used my Silhouette to make my own sun ray stencil. That allowed me to have a masked circle area for my sentiment. Masking was used to create the clouds. Wink of Stella glitter pen was used to add shimmer to the sun ray (sorry it does not show in the picture). A simple technique. Hope you ejoy
Supplies:
Archival Black for the sentiment
Broken China for the cloud
Squeezed lemonade and Whil Honey distress inks for the sun rays
Tuesday, January 14, 2014
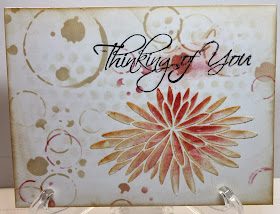
Thinking of you
This card is made using Stencils and molding paste. The flower is a stencil from Studio 490 "From the Garden". The stencil was taped down and molding paste added. The stencil was then removed and the molded image was allowed to dry. The stencil was then put back in place and Antique Linen and Aged Mahogany distress inks were used to color it. The Antique Linen was used with the Tim Holtz stencil "bubble" to begin the background to the card. The two distress colors were used with the Memory Box stencil "texture rings and puddles" to add a custom paper look to the card. A sentiment that has been around in the sentiment box was stamped with archival ink and clear heat embossed. Hope you enjoy.
Sunday, January 12, 2014
Stamps and Stencils
This card turned out so much different than what the starting idea was. The plan was to make a card with the four different pieces stamped. This is a 6 x6 card. A white cardstock was cut to 5.5 and then cut into two pieces. Each of those pieces was then cut into two uneven pieces. The Hero Arts "Dauber Bunch" was used to stamp the images. The "Thanks a Bunch" sentiment was stamped with Archival black and then clear heat embossed. Hero Arts inks were used for the stamped images. (Hero Hues "latte", Hero Shadow "pool" and "green hills". The next step was to distress the edge with Antique Linen. This still needed something so the Memory Box stencil " Texture rings and puddles" was stamped with the Antique Linen to add a background effect. The stamped images were then mounted onto a dark blue that was cut a 1/4 inch larger than the stamped piece. The final step was to mount all of the card pieces onto a base of green 6x6 paper. This was a fun card to make. Hope you enjoy.
Wednesday, January 8, 2014
Stencil Use
Stencils are becoming a fun way to make a card. Before long a new Online Card class will highlight these and I am signed up. Of course as my LSS store Fond Memories gets these new cardmaking toys in I have to give them a try. This card was made as a quick birthday greeting for a friend. I used the Memory Box "Butterfly Vine for this card. I started with a 4 x 5.25 piece of white cardstock. The next step was to use Antique Linen distress to get the outline of the stencil. The butterflies were colored with Copic Markers Y18, B32 and B34 and then this was mounted on a brown 5.5 x 4.25. A May Arts blue ribbon was added and this was mounted on the card base. This does not take long and is a simple card. Hope you enjoy.


